Advanced Bicep Concepts
Unlock the power of Bicep with advanced concepts that streamline your infrastructure-as-code templates! Discover how to manage nested resources, dependencies, conditional deployments, and loops to enhance efficiency and clarity in your deployments.

Introduction
In the previous post, we explored the foundational elements of Bicep, including data types, variables, parameters, functions, and modules. This time, we will delve deeper into more advanced concepts that will enable you to write more efficient and effective infrastructure-as-code templates.
Nested Resources
Nested resources in Bicep allow you to define resources that exist within the context of another resource (for example, how a subnet can only exist within the context of a virtual network). By using the parent attribute, you can create resources that are directly dependent on their parent resources.
For example, if you have a storage account and you want to create a blob container within that account, you can define that using two nested resources like this:
var location = resourceGroup().location

resource exampleStorageAccount 'Microsoft.Storage/storageAccounts@2023-05-01' = {
  name: 'myStorageAccount'
  location: location
  sku: {
    name: 'Standard_LRS'
  }
  kind: 'StorageV2'
}

resource exampleBlobServices 'Microsoft.Storage/storageAccounts/blobServices@2023-05-01' = {
  name: 'default'
  parent: exampleStorageAccount
}

resource exampleContainer 'Microsoft.Storage/storageAccounts/blobServices/containers@2023-05-01' = {
  name: 'myContainer'
  parent: exampleBlobServices
}
Alternatively, you could just use the name and also provide the name of the parent resource within that separated by /. But the deeper you get into these dependencies, the less clear the name becomes. Using that notation, the container would look like this:
resource exampleContainer 'Microsoft.Storage/storageAccounts/blobServices/containers@2023-05-01' = {
  name: 'myStorageAccount/default/myContainer'
}
Note how I have omitted the use of parent, but have given a name that provides the full relationship to the parent resources. I recommend keeping your names clean and just referencing the parent resources using the dedicated attribute.
Bicep Dependencies
In a multiresource deployment, Azure will attempt to parallelize as much as possible. In the previous example, we defined a series of resources that depended on each other for the deployment. For instance, I cannot create a blob service for a storage account that does not yet exist. However, since we are using the parent attribute, Azure is already aware of this dependency.
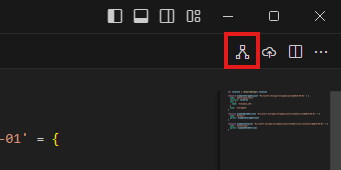
If you open Visual Studio (VS) Code and navigate to the top right corner, you will find the resource visualizer. This tool allows you to see what you are deploying and the existing dependencies.
The template from the previous example looks like this:

The arrows between the resources indicate their dependencies.
The first type of dependency is implicit. As demonstrated in the previous example, Bicep can infer the correct order of deployment from the references within the template. Using the parent attribute, relying on the outputs of another deployment, or referencing resources within other resources are all methods of defining a dependency that Bicep can handle natively. This is the recommended approach for managing your dependencies.
If, for any reason, it is not possible to infer the desired order of deployment, you can use explicit dependencies to enforce the sequence. Within the resource definition, you can utilize the dependsOn attribute to set the dependency explicitly. Let's say, for example, you want to deploy a storage account and then a web app, in that order and not in parallel. In that case, you could do something like this:
resource storageAccount 'Microsoft.Storage/storageAccounts@2023-05-01' = {
name: 'mystorageaccount'
location: 'West Europe'
kind: 'StorageV2'
sku: {
name: 'Standard_LRS'
}
}
resource webApp 'Microsoft.Web/sites@2024-04-01' = {
name: 'myWebApp'
location: 'West Europe'
dependsOn: [
storageAccount
]
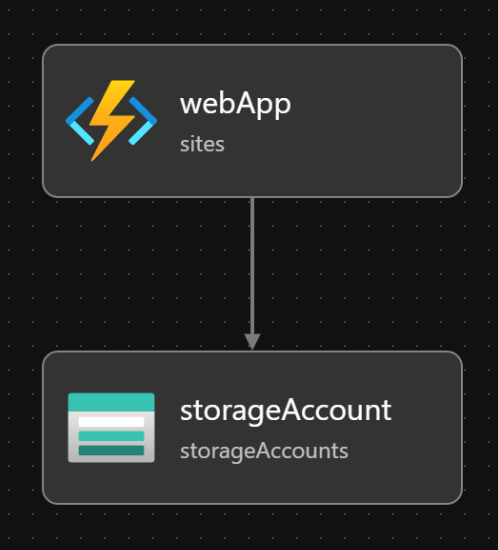
}If we now look at our resource visualizer, we would see that the deployment now occurs in the desired order.
Conditional deployment
With conditional deployment, you gain the ability to control whether a resource is deployed or not, based on the parameters meeting some conditions. By using the if keyword, you can decide if a specific resource has to be deployed or not. Let's say, for example, you want to deploy a resource, but when you do it in production, you have to also deploy a NSG to manage the network traffic. That would look something like this:
param isProduction bool = true

resource myProdNsg 'Microsoft.Network/networkSecurityGroups@2024-05-01' = if (isProduction) {
  name: 'myProd-Nsg-01'
  location: resourceGroup().location
}
Logical Operators
The next step is using operators to increase the complexity of your conditional deployment. Using the logical operators and, or, and not, you can do combinations of boolean values that grant you the ability to make your deployments more dynamic and flexible.
Let's build on the previous example and add a second condition. Let's add a second parameter isEnabled, which will also have to be true for the resource to deploy.
param isProduction bool = true
param isEnabled bool = true

resource myProdNsg 'Microsoft.Network/networkSecurityGroups@2024-05-01' = if (isProduction and isEnabled) {
  name: 'myProd-Nsg-01'
  location: resourceGroup().location
}
Only the combination of both parameters being set to true will trigger the deployment.
Ternary Operators
The final piece of conditions are ternary operators. With these operators, you are able to use a short syntax to evaluate a condition and then set the value given the condition. That line would look something like this: condition ? trueValue : falseValue. The boolean value condition is evaluated. If it is true, you get the first value after the ?, in this example trueValue. If it is false, then you get the value after the :, which in this example would be falseValue.
Let's say I want to deploy a storage account. If I'm testing, I want the storage account to only be locally redundant. If I'm deploying to production, I want it to be zone redundant, i.e., Standard_ZRS, which offers better availability but also costs more. Adding this logic using ternary operators requires a single additional line:
@allowed([
  'production'
  'integration'
  'testing'
])
param environment string

var storageSku = environment == 'production' ? 'Standard_ZRS' : 'Standard_LRS'
var location = resourceGroup().location

resource myStorageAccount 'Microsoft.Storage/storageAccounts@2023-05-01' = {
  name: 'myStorageAccount-01'
  location: location
  sku: {
    name: storageSku
  }
  kind: 'StorageV2'
}
Loops
With loops in Bicep, you can iterate through the elements of an array. Imagine you have to deploy three VMs. They have different names but are otherwise identical. In that case, you would create an array with the names of the machines and loop through them, while creating the VMs and assigning the correct element from the list to be the name. The code to achieve this looks like this:
param vmNames array = ['vm01', 'vm02', 'vm03']
param location string = resourceGroup().location

resource myVirtualMachine 'Microsoft.Compute/virtualMachines@2024-07-01' = [
  for vmName in vmNames: {
    name: vmName
    location: location
    properties: {
      // Insert your properties
    }
  }
]
Advanced Loops
Sometimes, it is not enough to iterate through a single array. If you want to iterate through several arrays at once, you can use advanced loops. This will allow you to iterate through a set of indices that you can use to access several arrays at once.
A good example would be to create a whole vnet. You could have an array with the name of the subnets and another array with the IP spaces for each subnet.
param subnetNames array = ['Tier0', 'Tier1', 'Tier2']
param subnetAddresses array = ['10.0.0.0/28', '10.0.1.0/24', '10.0.2.0/23']
param location string = resourceGroup().location

resource myVirtualNetwork 'Microsoft.Network/virtualNetworks@2019-11-01' = {
  name: 'myVnet-01'
  location: location
  properties: {
    addressSpace: {
      addressPrefixes: [
        '10.0.0.0/16'
      ]
    }
    subnets: [
      for i in range(0, length(subnetNames)): {
        name: subnetNames[i]
        properties: {
          addressPrefix: subnetAddresses[i]
        }
      }
    ]
  }
}
Note that the loop does not have to be in outer definition of the resource. You can also have a loop inside the resource.
Conclusion
This is my final theoretical post. After learning about nested resources, dependencies, conditional deployments, and loops, we have closed the preparatory chapters of this series. These concepts are the foundation for creating efficient and maintainable templates, which in turn will make your Bicep experience more enjoyable.
Stay tuned, because in the next chapters, we will continue deepening our knowledge of Bicep and get into practical examples that will require the knowledge acquired in the first portion of the series.