Azure Biceps: The Basics
In this guide, learn about the basic structure of a Bicep template—including parameters, resources, and outputs—and explore data types, built-in functions, variables, and modules to create reusable and flexible templates for managing your Azure resources.

In last week's post I introduced Azure Bicep, a domain-specific languange that makes managing your Azure resources much simpler. We also talked about the installation of some necessary tools and even deployed a first template. In this post, we will talk about the fundamental concepts of Biceps. By the end, you will have a better of understanding of what we did last week and you will be able to start deploying your very own templates.
The Basic Structure of a Bicep Template
A Bicep template is a simple text file with the .bicep extension. In this file you are supposed to define the Azure resources you want to manage. It normally consists of three sections:
- Parameters: In this section you define what values of your template are passed by the user. By passing values into the template, your variable becomes reusable and more flexible. It is best practice to place the parameters at the top of your template.
- Resources: This is where you define what Azure resources you want to deploy and what their properties are.
- Outputs: Here, you define the values that you want to get from the template after execution. This is useful could be useful, e.g., for referencing some previously deployed resource in the next part of the deployment.
Here is a very basic example of the structure of a Bicep template:
param location string = resourceGroup().location

resource storageAccount 'Microsoft.Storage/storageAccounts@2021-04-01' = {
  name: 'mystorageacct'
  location: location
  sku: {
    name: 'Standard_LRS'
  }
}

output storageAccountName string = storageAccount.name
Data Types in Bicep
Bicep offers a handful of data types, which facilitate the authoring of your templates. These data types are:
- String: A sequence of characters, for example in text based names or URLs. To initialize a string, we use single quotes (
'This is a string'). - Integer: A whole number, for example for counts, port numbers or sizes.
- Boolean: True or false values, for example, for toggling features on or off. Booleans in bicep take the values
trueorfalse, all in lower case. - Array: A collection of items of any type. This lists are defined using square brackets, like this:
[1, 2, 'string1', false]. Notice that when written in a single line the values are comma separated. It is also possible to use an array by entering a single value per line and not using commas. - Object: A complex type that can hold multiple properties in a key-value pairing collection. It is defined by using curly brackets likes:
{name: 'SomeName', number: 12}. The multiline definition of these data types is also possible. Again, you just have to remove all commas.
Understanding the available data types and the correct syntax is essential for effectively defining parameters, resources and variables.
Helpful Built-In Functions
There are several built-in functions provided by Bicep that can enhance the functionality in your templates. Here are some examples:
- resourceGroup(): Returns the resource group in which the Bicep file is being deployed. I use this frequently to define the location of my resources to be the same as the location of the resource group. You can call
resourceGroup()and get its location property like this:resourceGroup().location. - subscription(): Returns the subscription for associated deployment.
- resourceId(): This function get the ID string of a resource for you. I've used it to get the ID of objects that are not defined in the same Bicep file. For example, let's say I want to get the ID of a subnet. I would do it like this:
resourceId('Microsoft.Network/virtualNetworks/subnets', vnetName, subnetName)
Alternatively, and what is arguably the recommended way, would be to define a new resource and use the existing keyword to fetch the resource. For example:
resource myoldSubnet 'Microsoft.Network/virtualNetworks/subnets@2024-01-01' existing = {
  name: subnetName
}
Beyond accessing information about the deployment, built-in functions allow you to perform operations on the data you are working with. For example, you can manipulate strings with functions like concat(), length() or toLower().
Using these functions allows you to operate better inside your tempalte and gain some contextual information from the deployment (without needing to rely on parameters). Here is a full list of all built-in functions in Bicep.
Parameters
When writing your own template, you will start to notice that you can actually reuse most of it. Certainly, you will like to change some things like the name of a VM or the password of the local admin. But most of the Bicep file is reusable. That's why I interchangeably refer to that file either as a Bicep file or a Bicep template.
Let's say you have written down the Bicep file to deploy a storage account. And it looks something like this:
resource myStorageAccount 'Microsoft.Storage/storageAccounts@2023-05-01' = {
  name: 'MyStorageAccount'
  location: resourceGroup().location
  sku: {
    name: 'Standard_LRS'
  }
  kind: 'StorageV2'
}
Initially, this is fine. But what if you wanted to now deploy a second storage account, same SKU, same kind, maybe in a different location, with a different name? Let's parameterize that file so it can take inputs from the users to define their own names and locations.
param storageAccountName string
param storageAccountLocation string = resourceGroup().location

resource myStorageAccount 'Microsoft.Storage/storageAccounts@2023-05-01' = {
  name: storageAccountName
  location: storageAccountLocation
  sku: {
    name: 'Standard_LRS'
  }
  kind: 'StorageV2'
}
I have added two lines that start with param. The first one defines a parameter called storageAccountName and gives it the type string. The second one is similar but for the parameter storageAccountLocation. The last one has also a default value. This is the value that will be taken if nothing is given. In that sense, storageAccountName is a required parameter. Without it, the template is missing information. The parameter storageAccountLocation is an optional parameter. The template can be deployed without having to specify that value, but the user has the option to define it too.
Through the use of parameters, you can increase the flexibility of your Bicep deployments.
Passing parameters
Passing parameters to a template that allows it can be done in two ways. The first one is using the terminal. For example, if you deploy using PowerShell, you could do something like this:
New-AzureResourceGroupDeployment -ResourceGroupName 'MyResourceGroup' -TemplateFile .\storageAccount.bicep -storageAccountName 'TestStorageAccount' -storageAccountLocation 'westeurope'In this case, the template parameters are storageAccountName and storageAccountLocation. It blends with the other parameters of the PowerShell function. The same is also possible if you prefer to use the Azure CLI, which looks like this:
az deployment group create --resource-group MyResourceGroup --template-file storageAccount.bicep --parameters storageAccountName="TestStorageAccount" location="westeurope"Alternatively, you can also use a so-called parameter file (or param file). In that case, you can create a JSON file in which you store all the necessary values for the deployment of the template. The parameter file looks like this:
{
  "$schema": "https://schema.management.azure.com/schemas/2015-01-01/deploymentParameters.json#",
  "contentVersion": "1.0.0.0",
  "parameters": {
    "storageAccountName": {
      "value": "TestStorageAccount"
    },
    "storageAccountLocation": {
      "value": "westeurope"
    }
  }
}
If you are anything like me, you think this is a tedious way to do things because it requires you to create this complicated file. Luckily, Visual Studio (VS) Code (or rather the Bicep extension for VS Code) is able to handle that for you.
To generate a parameter file using VS Code, right-click on the template you want to create the parameter file for.
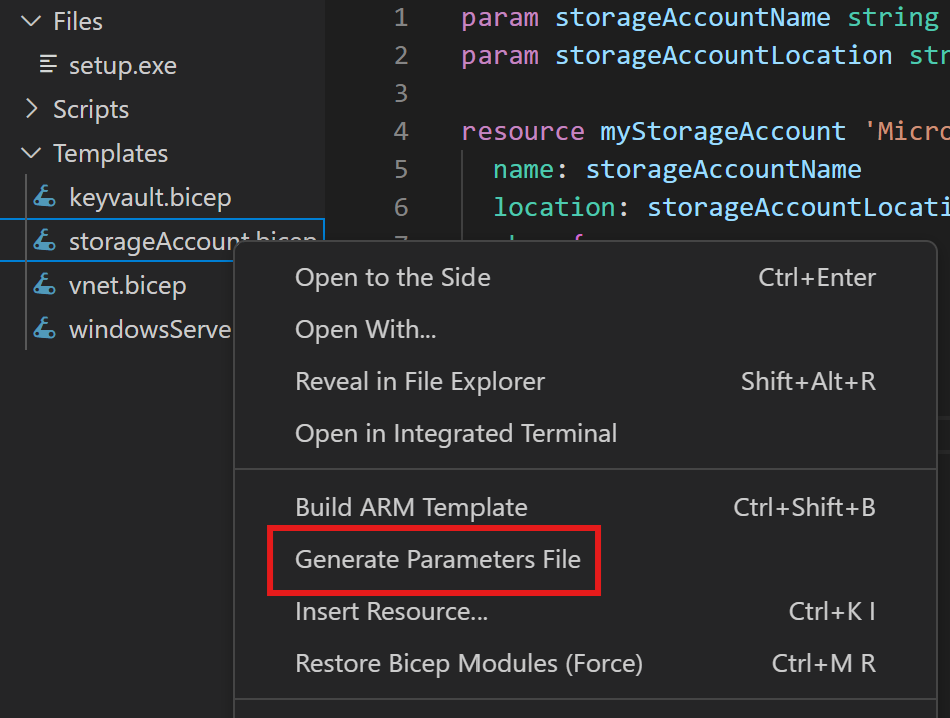
When you go that route, you will notice that there are two options offered by the extension: a regular parameter file in JSON format like shown above, or something called a .bicepparam file. That looks like this:
using './storageAccount.bicep'

param storageAccountName = 'TestStorageAccount'
param storageAccountLocation = 'westeurope'
Finally, to deploy the template using these parameters, you have to tell the PowerShell function where the file is using the -TemplateParameterFile switch.
Variables
Bicep allows you to define variables, which store values that can be reused throughout the template. This saves you the effort of having to type the same information repeatedly. It also improves readability and helps when refactoring is needed. To declare a variable, you use the var keyword.
For example:
var storageAccountSKU = 'Standard_LRS'You can then reference this variable when defining resources, like so:
param storageAccountName string
param storageAccountLocation string = resourceGroup().location

var storageAccountSKU = 'Standard_LRS'

resource myStorageAccount 'Microsoft.Storage/storageAccounts@2023-05-01' = {
  name: storageAccountName
  location: storageAccountLocation
  sku: {
    name: storageAccountSKU
  }
  kind: 'StorageV2'
}
Outputs
Outputs in Bicep provide a way to return values after the deployment of resources. This is particularly useful when you want to expose certain resource properties for further use or integration with other templates.
Example of defining outputs:
output storageAccountId string = storageAccount.id

output storageAccountPrimaryKey string = listKeys(storageAccount.id, '2021-04-01').keys[0].value
In this example, we output the ID and primary key of the created storage account, making it easy to reference these values later.
Azure Bicep Modules
Let's say you have a good template for a virtual network (VNet) and another one for a virtual machine (VM). A module allows you to reuse these components. Essentially, you call a Bicep file from another Bicep file. This modularity and the ability to reuse your code are huge!
To define a module, you call another Bicep file from your main deployment file. That would look something like this:
var location = resourceGroup().location

module storageAccount 'storageAccount.bicep' = {
  name: 'mystorageModule'
  params: {
    storageAccountName: 'TestStorageAccount'
    storageAccountLocation: location
  }
}
(I added the variable location just because it is good practice not to hard-code your locations inside your templates. It does not mean that it is not possible.)
Ideally, I would like to have a template for each resource (or set of resources that are always deployed together) that I have perfected for my use case. And finally, I would use modules to combine everything I need for a certain deployment in one Bicep file.
Conclusion
Bicep is a powerful, yet readable and user-friendly (especially when you work with the VS Code extension) way to manage your Azure resources. Understanding the basic concepts is the first step in becoming proficient at efficiently managing your resources, creating reusable and adaptable templates that fit various scenarios. Mastering Bicep will significantly enhance the way you manage your Azure infrastructure.
If you haven't yet, subscribe so you don't miss the next post of this Bicep series.